From the File menu, select Export, then select Export GUI.
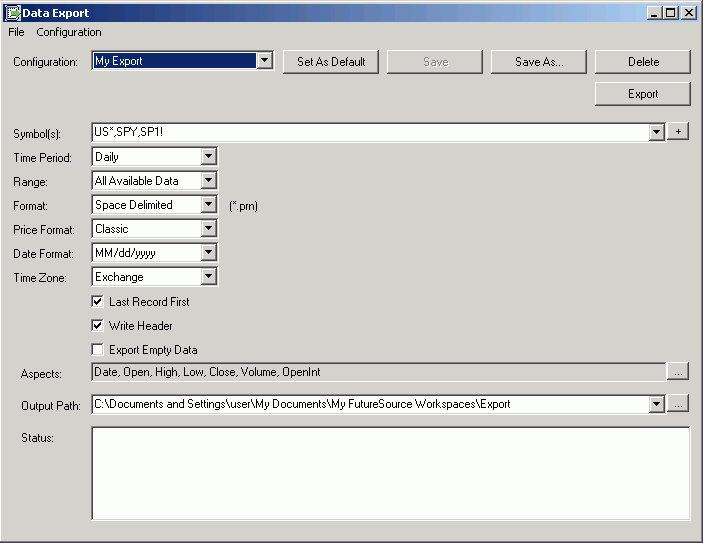
Result: The Data Export dialog box displays.

If you wish to export a previously saved Configuration, select the Configuration name from the drop down list, and click Export. If you wish to create a new export, proceed to Step 3.
In the Symbol(s) field, enter the symbols you wish to export. Click here to view valid options.
To find symbols using the Symbol Search dialog box, click the + at the far right of the Symbol(s) field.
Select the Time Period from the drop-down list. Valid Time Periods include Tick, Intraday, Daily, Weekly and Monthly data. If you select Intraday, you will also be prompted to enter the number of Minutes/Bar.
Select the amount of data you wish to export using the Range drop-down list:
|
FOR ... |
you may select ... |
|
Tick Data |
All Available Data or a Number of Records. |
|
Intraday Data |
All Available Data or a Number of Records. |
|
Daily Data |
All Available Data, a Number of Records, Number of Days, or a Date Range. |
|
Weekly Data |
All Available Data, a Number of Records, Number of Days, or a Date Range. |
|
Monthly Data |
All Available Data, a Number of Records, Number of Days, or a Date Range. |
Note: When choosing a Number of Records, Number of Days or a Date Range, you are required to specify the number or date range.
From the Format drop-down list, choose the way in which the data will be saved (space, comma or tab delimited.)
From the Price Format drop-down list, choose the way in which price data will be saved (classic, formatted or decimal.)
From the Date Format drop-down list, choose the way in which dates will be saved.
From the Time Zone drop-down list, choose which zone the times will be represented in (Local, Exchange or UTC.)
Specify additional export options:
|
Field Name |
Description |
|
Last Record First |
When checked, the most recent record will appear first in the data file. |
|
Write Header |
When checked, the first record in the data file will consist of "header" records that describe the data contained in each segment of the file. For example, headers such as "Date", "Open", "High", "Low" and "Close" are written as a header record. |
|
Export Empty Data |
When checked, an empty record will be written if the system finds no data for the selected time period/contract. |
The Aspects field identifies the fields of data that will be exported. To change the aspects, click the ... button to the far right of the Aspects field.
In the Output Path field, identify where you want the exported data saved.
Click the Export Data button at the top of the screen to start the export. The progress of the export displays in the Status field.
If desired, you may save the details of this export as a "Configuration" that may run again at a later time. To save this export as a NEW Configuration, click the Save As button at the top of the screen and provide a name for this export. You may also set a Configuration as your Default Configuration by clicking the Set As Default button at the top of the screen.
To exit the Data Export dialog box, click the X in the upper right corner, or from the File menu, select Exit.